Showing posts with label tricks. Show all posts

30 May 2011

Useful Windows 7 Shortcuts...


  • Windows key + Left: docks current window to the left side of the screen
  • Windows key + Right: docks current window to the right side of the screen
  • Windows key + Up: maximizes and/or restores foreground window
  • Windows key + Down: minimizes active window
  • People with a multi-monitor setup, Windows + SHIFT + Left (or Right) will shift a window from monitor to monitor
  • If you press Windows + 1, it will create a new instance of the first icon in the task bar. This is handy if you do a lot of coding and need to open several instances of a program
  • To Run a program as an Administrator, it’s now as easy as holding CTRL + SHIFT when you open the application

12 June 2010

Enable hidden built in administrator account in Windows Vista


Windows Vista has a Hidden administrator account which can be used to run any application with administrator privilege without the annoying UAC control.

here are the steps to enable it...

*Click on start menu
* Type "cmd" on search bar
* Select cmd, right click and select "Run as Administrator" option
* Now in cmd prompt
type: 'net user administrator /active:yes',
then press enter

Now you have activated the admin account.

To disable

* Just type: 'net user administrator /active:no'
* press enter

Done Thats it.....Rep me for Queries...

02 June 2010

Access Hidden Themes & Wallpapers in Windows 7


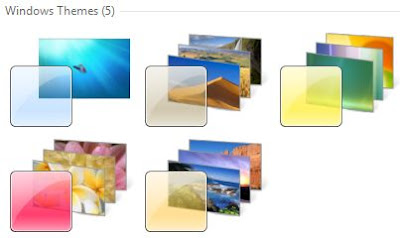
Windows 7 has hidden Themes and wallpapers.Normally, you can't access those backgrounds or themes, though, are background scenery and themes from other English-speaking countries -- Australia, Canada, Great Britain and South Africa., but there is a simple way you can install and use them.

Here are The Steps..

1. In the search box in the Start menu, type

"C:\Windows\Globalization\MCT "

and press Enter. (Note: If Windows 7 is installed in a drive other than C:, use the respective drive letter instead.)

2. Windows Explorer will launch and show you a list of subfolders

3. Under C:\Windows\Globalization\MCT: you can see some folders like MCT-AU, MCT-CA, MCT-GB, MCT-US, and MCT-ZA. Each subfolder has wallpapers for a specific country

AU for Australia, CA for Canada, GB for Great Britain, US for the United States, and ZA for South Africa.

* For any of the countries whose wallpaper and themes you want to use, go into its Theme folder, for example, C:\Windows\Globalization\MCT\MCT-ZA\Theme.

* Double-click the theme you see there (for example ZA).

* That will install a shortcut to the theme and wallpapers in the Personalization section of Control Panel.

You can now use them as you would any other theme or background, by right-clicking the desktop, choosing Personalize, and choosing a background or theme. They will be listed in their own section.

Why these thing are locked...

When you first install Windows 7, it asks for your language, time and currency. Based on your responses, it installs a set of wallpapers and themes. If you choose English (United States) for your time and currency format, for example, the available desktop backgrounds and themes will include a United States section with scenery from locations such as Maine, the Southwest and so on. so for each specific location seperate themes get installed...
01 June 2010

Restore Quick Launch bar in Windows 7


Windows 7 has upgraded the Quick launch bar into a new taskbar functions as a program launcher as well as task switcher. So the old Quick Launch bar on the left side of the taskbar that contained shortcuts for frequently used programs, has been Vanished. However, if you really intend to regain that functionality, you can add it back.

Here are the steps..

* Right-click the task bar and choose Toolbars --> New Toolbar.

* You'll be asked to select a folder for where the new toolbar should live. In the Folder text box at the bottom of the dialog box, enter this text:

"%userprofile%\AppData\Roaming\Microsoft\Internet Explorer\Quick Launch"

* After you do that, click Select Folder.

* A link for the Quick Launch bar will be added to the taskbar.

* It will be on the right of the taskbar, just to the left of the Notification area.

It's not particularly docked all the way to the right with no application icons showing, so we're going to have to do a bit of work on it to make it useful.

* Right-click the task bar

* In the pop-up menu remove the check next to "Lock the task bar"

* Now right-click Quick Launch and remove the checks next to Show Text and Show Title.

Once you've done it, drag the vertical triple dotted line next to the Quick Launch bar to the left until you expose its icons. To prevent further changes, right-click the taskbar and check Lock the taskbar. You can now use the Quick Launch bar as you could in Windows XP and Vista, including adding icons to it and deleting them.

18 May 2010

Windows 7 Desktop Tweak


"Shake" your desktop free of clutter

If you frequently run multiple programs simultaneously or have multiple windows opened side by side, your desktop can get extremely cluttered & looks untidy. This can get annoying if you're working on one program and want to minimize all the other windows except the one which you are working on.

In previous versions of Windows you had to minimize them individually, but with Windows 7's "shake" feature, though, you can minimize every window except the one in which you're currently working in a single step.

* Click and hold the title bar of the window you want to keep on the desktop

* While still holding the title bar, shake it quickly back and forth until all of the other windows minimize to the task-bar.

* Then to make them return, shake the title bar again.

You can accomplish the same thing by pressing the Windows key+Home key combination although doing this is not nearly as much fun as "Shaking".


15 May 2010

Add Video Links to Windows7 Start Menu


The WINDOWS 7 Start Menu includes links to your pictures & Music Folders, but not to your Videos Folder. If you watch a lot of videos & want to link to them on your Start Menu, here's what you can do

Follow these simple Steps:

* Right Click the Start button & select Properties.

* On the screen that appears, go to the Start Menu tab & click Customize.

* In the dialog box that appears, scroll to the bottom, look for the Videos section.


* Select "Display as a link" & click OK & then OK again.

Note:

If you prefer that videos display as a menu, with links to files & sub-menus, instead select "Display as a menu" option.

14 May 2010

Running Incompatible S/W in Windows 7


The Major drawback of Vista was it's Compatibility issues with older programs. But Windows 7 comes with a Program Compatibility Mode that simulates the behavior of of previous versions of windows for that program. You can change the compatibility settings for a program either manually or by using the Program Compatibility Troubleshooter

Here are The Steps to do it Manually..

* Right click on the program which you wish to run on compatibility mode

* Choose Troubleshoot Compatibility

* A Program Compatibility Assistant will be launched

* It automatically detects known Compatibility issues

* Notifies you if it finds any issues

* Tries to fix it the next time your program is run

Note:

It does not make any changes to your program. It just resolves the conflicts with UAC giving high privilege to your program or simulate an earlier version of Windows.

12 May 2010

Orkut Profile Background Music...

1) Log in to your Orkut account.

2) Click on the below link & Add this application to your profile

2) Upload/add your favourite music to this application just by selecting the Upload option from the application Window.

3) Copy the HTML Code highlighted in yellow below the 3d spectrum music player .

4) Goto OLD orkut version & paste it in your Scrapbook and click Preview.

5) Preview shows u a frame of 3d spectrum music player .......where you can see
"(click here to get it)".

6) Then with the hold on (ctrl) key & click on "frame"

7) You can see a boundry of blue line which cover the whole frame of 3d spectrum music player

8) Copy it by right clicking just near the (click here to get it) click on free space......... then u have the option to copy

9) Goto NEW orkut and Paste the copied player into About Me. Click SAVE.

Now its done your song will be played automatically on your profile...

Please use Firefox or Google Chrome, this trick doesn't work in IE....Buzz me for any quests..!!!

29 June 2009

Windows XP Genuine Registry Keys.

For windows genuine Registry key click on the below link...

DOWNLOAD

Usage:

download the above file and extract it to a folder, in the folder you can find lots of genuine registry keys, add any one of the registry key to your registry editor....

Enjoy..

28 June 2009

Aborting a shutdown process.

For aborting a shutdown process, here are the steps.

1. Right click on your desktop and choose New option.

2. Then choose Shortcut from the popped window.

3. In the location tab browse to the root folder of your system for selecting shutdown file,

the location could be somewhat like “C:\Windows\System32\shutdown.exe

4. After selecting the file, type “-a” at the end.

5. The argument “-a” denotes abort.

6. Finally click on the Finish button to create the shortcut.

For tutorial download the demo file for the above steps from the below link.

DOWNLOAD

That’s it now using this you could abort a shutdown process that is clicked unknowingly.

27 June 2009

Creating a shortcut for shutdown.

Here I’ll tell you all how to shut your system with a single click, for those who wish to reduce the number of mouse click to turn off.

1. 1. Right click on your desktop and choose New option.

2. 2.Then choose Shortcut from the popped window.

3. 3.In the location tab browse to the root folder of your system for selecting shutdown file, the location could be somewhat like “C:\Windows\System32\shutdown.exe

4. 4.After selecting the file type “-s –t -10” at the end of the file name.

5. 5.Or else you just type “shutdown.exe –s –t 10” in the location tab.

6. 6.The arguments “-s” and “-t” indicates shutdown and time interval.

7. 7.The time interval is specified in seconds you can alter according to your wish.

8. 8.Finally click on the Finish button to create the shortcut.

For tutorial download the demo file for the above steps from the below link

DOWNLOAD

Now you are done.

26 June 2009

Remote Desktop Access.

I have recently come across a brilliant networking tool, which allows us to access remote desktops Easily using simple software called TEAMVIEWER. What is the procedure to do this? Here we go

Pre-requisites:

The TEAMVIEWER software should be installed on both the machines.

Steps:

1. Download TEAMVIEWER software from the below link

DOWNLOAD

2. After downloading it you can run the software with or without installing it.


3. Now in the home screen's first column your ID and Pass will be there and

In the second column there will be a space for entering your friend's ID.

4. You should get your friend's ID and pass from him/her for accessing their Desktop

5. Or you should give your ID and pass to allow them to view your Desktop.

6 .After getting their ID type it in the required field and click the connect to partner button

7. After this you will be asked for your friend’s pass. Enter correctly.

8. it’s done, now you can view and access your friend’s Desktop remotely.

That’s it now you or your buddy could access Desktops from different ends.

24 June 2009

Installing Windows XP on a pre-installed VISTA Computer.


There is a simple way to install XP on a pre installed Vista. Here are the simple steps to do that.

Follow the given steps one by one.

1. The first step is to create a separate partition for XP, this can be done using ShrinkVolume feature in Vista.

SHRINK PROCEDURE:

· Open the Computer Management panel, which you can find under Administrative tools or by right-clicking the Computer item in the start menu and choosing Manage

· Find the Disk Management item in the list and select that.

· Now shrink your volume by right-clicking on the main hard drive and choosing Shrink Volume


· Now choose the size that you want to shrink according to your requirement. Minimum of 10GB can be chosen for ease of use.
· Now create a new partition for XP in the unallocated space and rename the partition as XP to avoid confusion
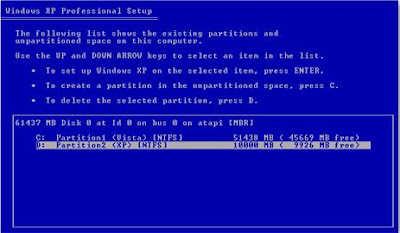
2. Now you'll have to pop your XP CD into the drive and bootoff it. You may have to configure your BIOS to enable booting off the CD drive.

3. Once you come to the screen where you can choose the partition to install on, and then choose the new partition you created. Whatever you do, don't try and install it onto your Vista partition.

4. After XP is completely installed at this point, and you will have lost your ability to boot into Windows Vista, so we'll need to use the VistaBootPro utility to restore the Vista boot loader.

Download and install VistaBootPro from vistabootpro.org

Or click on the below link for direct download.

VistaBootPro DOWNLOAD

5. During the install you'll be forced to install the .NET 2.0 framework.

Download the .NET 2.0 framework from here

Download

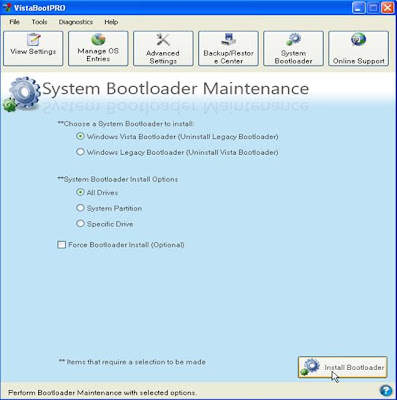
6. After installing it Open up VistaBootPRO and then click on the System Boot loader tab. Check the "Windows Vista Boot loader" and then "All Drives" radio buttons, and then click on the Install Boot loader button.

7. Now the Windows Vista boot loader is installed and you'll only be able to boot into Vista, to fix that just click the Diagnostics menu item and then choose Run Diagnostics from the menu.


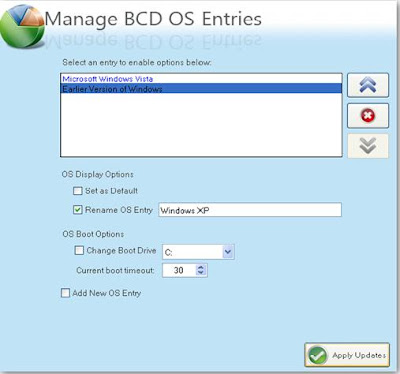
8. This will scan your computer and then automatically fill in the XP version... click on the "Manage OSEntries" tab and then click in the textbox for Rename OS Entry, and name it something like "Windows XP".

Click the Apply Updates button and then reboot your computer… you should see your shiny new boot manager with both operating systems in the list.

Alternative for step 7 and 8:

Instead of doing those steps you can try these steps.

1. Open up VistaBootPRO, click on the Manage OS Entries tab.

2. Tick the check box ADD NEW OS ENTRY.

3. Give the appropriate OS NAME in the first tab.

4. Select Vista legacy in the OS Type.

5. Select the OS drive where the Vista OS is installed probably be C:

6. Click on Apply Updates button and then reboot your computer.

Now you can boot into both the XP and VISTA....Enjoy